Angled Leg Press Guide: Form, Muscles and Depth
Learn what an angled leg press works, how to set up safe form, choose knee depth and foot placement, and how it compares with squats.

You've got forty minutes before work, the squat rack is occupied, and your lower back is still grumpy from yesterday's deadlifts. In the corner sits a sled on rails with a wide footplate, and someone is sliding a third plate onto it. They sit down, lower the platform until their knees are close to their chest, and press it back up. From where you're standing, it's impossible to tell whether that's textbook form or a fast route to a sore back.
The angled leg press is one of the most used machines in any gym and one of the least explained. Gym-goers often pick up two pieces of advice: go deep, and keep your feet flat. Neither is wrong, and neither is complete. Depth and foot placement are settings you adjust to your body and your goal, and the research behind this machine shows exactly why one universal rule falls apart.
What an Angled Leg Press Is and Why Lifters Use It
A padded back rest and a footplate, both mounted on a carriage that slides along a track set at roughly 45 degrees. That angle describes the rail the sled travels on, not the position of your body. You sit or recline, plant your feet on the platform, and push the whole carriage away from you.
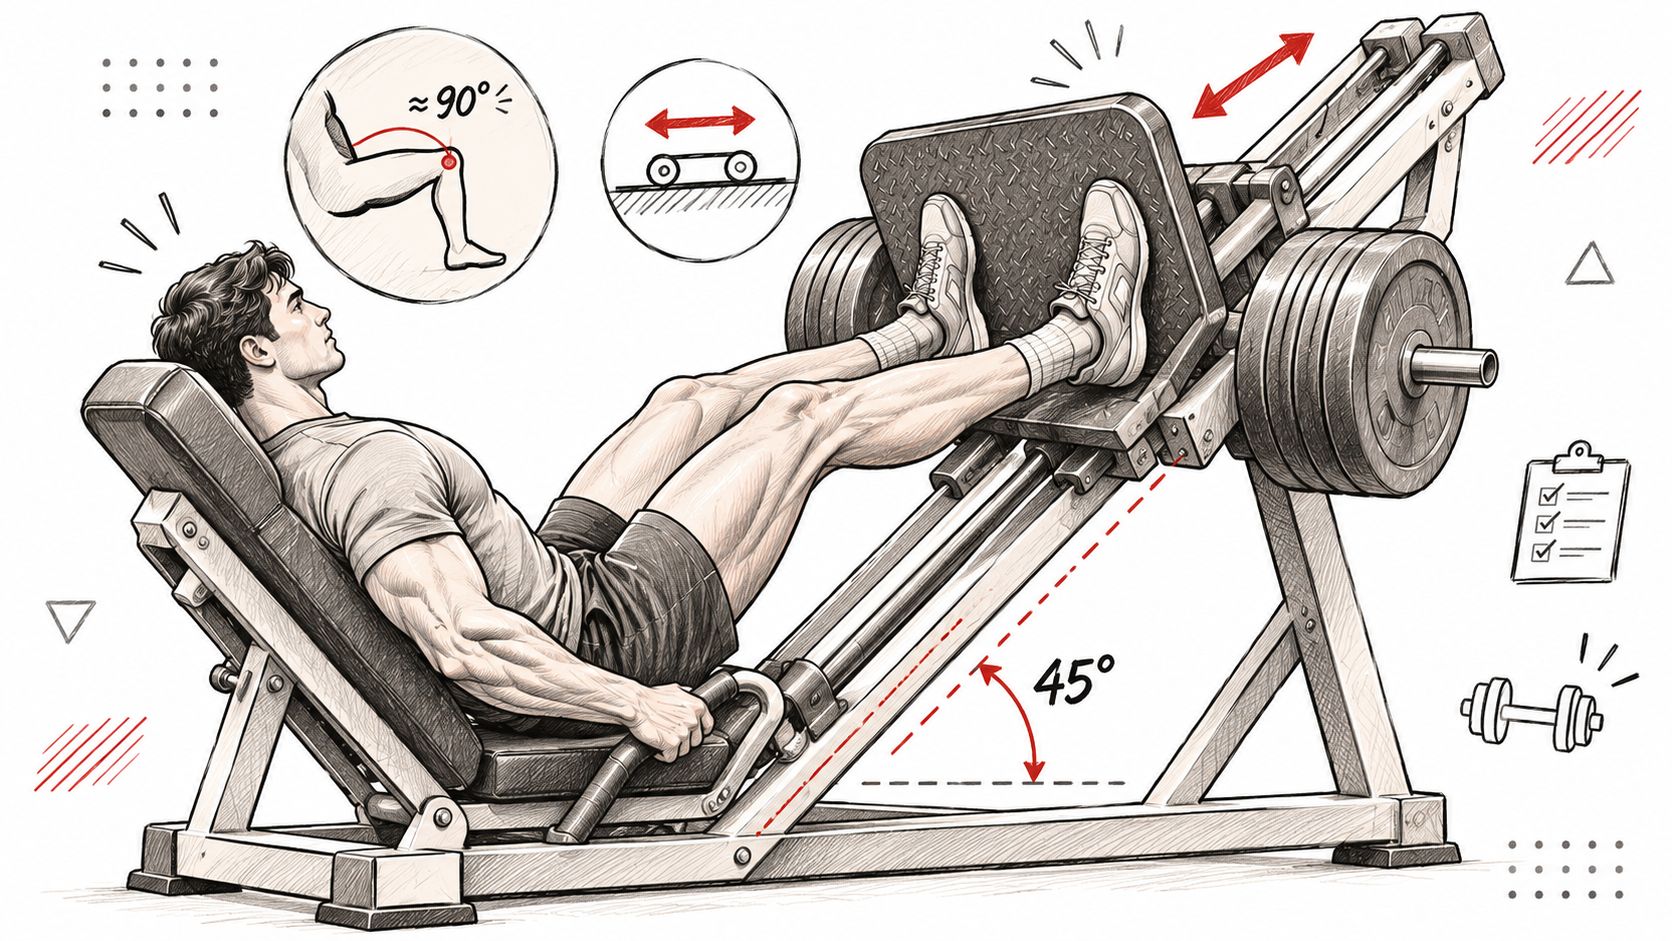
The guided path is the entire point. A free squat is like walking a balance beam: your legs move the load, but your trunk, hips and ankles burn effort keeping you upright and steady. The angled leg press is that same walk with a handrail bolted alongside. Your legs still move the weight, and the machine handles the balancing.
The movement pattern is simple. Feet on the platform, knees bent, press until the knees are nearly straight, then return under control. Because the knees and hips both extend, it's a multi-joint lower-body exercise, not a dressed-up leg extension.
Lifters use it for four reasons. The back and trunk are supported, so the legs can work hard on a day when the spine is fatigued. It adds lower-body volume without a bar across the shoulders. It slots naturally after heavy squats or deadlifts. And it teaches beginners leg drive with far less coordination demand than a free-weight squat.
Designs differ. Plenty of gyms run a plate-loaded 45-degree sled; others have a seated horizontal press or a selectorized machine with a weight stack and pin. Track angle, handle position and starting resistance all change, but the movement underneath is the same.
How to Use an Angled Leg Press Step by Step
Setup decides more about a leg press set than the plates do. Seat height, foot position and depth come first, and load comes after.

Start with the seat. Your back pad and hips should sit flat, with no gap under the lower back, and your knees should line up near the platform edge at the bottom. A seat set too far back pushes your tailbone off the pad at depth. One set too close jams your knees toward your chest before your legs have done any real work.
The setup, in order
Adjust the seat. Back pad and hips flat, knees lined up with the platform edge.
Place your feet. Shoulder width or slightly wider, toes turned out a few degrees, whole foot in contact, mid-platform to start.
Release the safety stops only once you're positioned, and find the stops with your hands before the first rep.
Brace. Breathe in, tighten the trunk, press your head and upper back into the pad.
Lower for about two seconds until you reach your chosen depth or your pelvis starts to lift off the pad, whichever happens first.
Press through the mid-foot and heel to just short of lockout. Keep the sled moving rather than slamming the knees straight.
Re-engage the stops, rest, then repeat.
Track depth, not just weight. Research on the inclined leg press standardized a 0 to 90 degree knee-flexion excursion, with stance widths of 100% and 150% of hip width, foot rotation of 0 or 45 degrees outward, and controlled 2-second lowering and lifting phases, precisely so that muscle-activation comparisons meant something (inclined leg press technique study). The same body of work notes that leg-press studies commonly use ranges from around 120 degrees of knee flexion to near full extension, so a plate count with no stated range tells you almost nothing.
Tempo is the second dial. A controlled two seconds down and two seconds up suits muscle-building work and joint-friendly technique. Heavier, faster reps belong to experienced lifters who can keep the sled moving smoothly without bouncing out of the bottom.
Common slips and the fix
Knees caving inward. The load is too heavy or the stance is too narrow. Widen slightly and drop a plate.
Heels lifting. Usually a foot position too low on the platform or tight ankles. Move the feet up an inch.
Bouncing out of the bottom. You're using the sled's momentum instead of your muscles. Slow the lowering phase until you can stop cleanly at depth.
Locking the knees hard. Force transfers straight into the joint. Stop a few degrees short and keep tension.
Hips rolling off the pad. That's your depth limit announcing itself. Raise the safety stop and stay above it.
The check: a set is good when every rep reaches the same bottom position, the knees track steadily over the toes, and your back stays on the pad from the first inch to the last.
Muscles Worked and What the Research Shows
Ask what the angled leg press trains and the short answer is the quadriceps. The vastus lateralis, the outer sweep of the thigh, does the bulk of the knee extension. The glutes and hamstrings assist the hip extension, with the split depending on where your feet sit and how deep you go. Your trunk does very little, because the back pad and sled carry the balance that a barbell squat loads onto your spine.

This isn't a light accessory movement. In a controlled comparison of trained participants, the leg press produced significantly greater vastus lateralis electromyographic amplitude than a knee extension, with a large effect size (ES = 0.92; p = 0.003), which confirms it as a genuine multi-joint knee-extensor exercise (leg press versus knee extension comparison). The same work found maximal leg pressing reached a peak knee-flexion angle of about 109 degrees, against roughly 98 degrees in the squat, while peak hip-flexion angles were similar at about 78 and 81 degrees.
Translated: the machine lets your quadriceps work through a deep knee bend without a loaded bar sitting on your upper back.
Electrical activity recorded during a set shows that a muscle is working. It doesn't promise long-term growth, and it doesn't tell you which depth or foot position builds the most muscle over a training block.
That distinction matters, because the obvious follow-up question is the one many people skip past. If the quads are the target, how deep should you go, and does the angle you're working at change what you can lift?
Knee Angle and the Force You Can Produce
Force on a leg press isn't constant through a rep. It changes with how bent your knee is at that moment, and the change is bigger than most lifters expect.
Researchers measured maximal one-leg force on a seated leg press in 18 participants at knee angles from 30 to 100 degrees of flexion, in 10-degree steps (leg-press force across knee angles).
Maximum seated leg-press force by knee angle
Knee flexion angle | Average maximum force (N) |
|---|---|
30 degrees | 3,369 (± 575) |
40 degrees | 3,239 |
50 degrees | 2,748 |
60 degrees | 2,236 |
70 degrees | 1,750 |
80 degrees | 1,385 |
90 degrees | 1,157 |
100 degrees | 1,015 (± 152) |
Read the columns downward and the pattern is a steady slide, not a cliff. Average force fell from 3,369 newtons at 30 degrees to 1,015 newtons at 100 degrees, an approximate 70% reduction across the tested range, with 2,748 N at 50 degrees and 1,750 N at 70 degrees in between. Passive tissue forces had only a minor influence on those numbers, so the drop came mostly from the muscles' changing length and the mechanics of the joint at each angle.
What that means on the gym floor: a plate number means nothing unless you state your depth. The load that feels honest at a shallow bend will feel entirely different in the bottom position, and comparing your set to someone else's is meaningless without the same range.
One caveat keeps this honest. The experiment used a seated one-leg press, not every 45-degree sled on the market, so treat the curve as a pattern rather than a fixed rule for your machine. The practical result holds regardless: deeper positions reduce the force you can produce at that instant and increase the challenge of controlling the bottom range.
How Deep to Go for Your Goal and Body
Deep reps get framed as the brave, correct choice. The evidence is flatter than that, and it's worth knowing before you chase a full stack to your chest.
A 2025 randomized within-participant study of 23 resistance-trained adults compared unilateral leg pressing through a standardized knee-flexion range of roughly 5 to 100 degrees against each person's own maximum range, which averaged about 5 to 154 degrees (trial comparing standardized and individualized leg press depth). After eight weeks of training to momentary failure twice a week, quadriceps thickness increased by about 1.08 to 1.91 mm in both conditions, with no clear hypertrophy advantage for the deeper individualized range.
Be careful about how far that finding stretches. It didn't test every machine design, every pelvis position or every knee symptom profile, and it didn't prove that all depths are equally suitable for all people.
A depth decision you can repeat
Contact before depth. Choose the point where your back and pelvis stay on the pad, your knees track over your toes and no joint position hurts. That's your ceiling, whatever the internet says.
Then match depth to the goal. For muscle building, a consistent, comfortable range trained hard beats a heroic range trained sloppily. For strength testing, a repeatable depth is the only fair comparison across weeks. For beginners and anyone returning from injury, a shallower pain-free range progressed gradually does more good than a deep one you can't control.
Work within your own structure. Hip socket depth, ankle mobility and pelvic control set how far you can travel before your lower back rounds. If your ankles or hips limit you, address that separately with hip mobility exercises for squats rather than forcing depth on a machine.
Pick one depth and hold it for several weeks. Changing depth and load at the same time leaves you with no idea which one produced the result.
Foot Placement and How It Changes the Work
The gym myth is tidy: feet high on the platform for glutes and hamstrings, feet low for quads. The evidence is messier. A systematic review of leg-press variants found high foot placement produced greater gluteus maximus activity in some comparisons, while low placement differed in selected muscle-activation outcomes, with results shifting across studies and machine setups (systematic review of leg-press variants).
Foot placement setups and their trade-offs
Setup | Usual emphasis | Trade-off to watch |
|---|---|---|
High foot placement | Greater glute activity in some comparisons | More hip flexion at the bottom; keep the pelvis on the pad |
Mid platform, hip-width stance | Not isolated in this research | Baseline setup for most lifters; record it for comparison |
Low foot placement | Differed in selected muscle-activation outcomes | Higher knee-flexion demand; watch knee comfort |
Wider stance, toes turned out | Hip and knee contribution shifts | Useful only with steady knee tracking and consistent depth |
Narrow stance, toes forward | Outer-quad emphasis claimed, not confirmed in this research | Keep testing one variable at a time |
The mechanics behind those rows are simple. A very high foot position asks for more hip flexion and can push you past your pelvic control sooner. A very low position loads the knee through a longer, more demanding arc.
And a reminder about what surface EMG can support. It records activity during a set; it doesn't prove a position builds more muscle over months.
Test one variable at a time. Hold your baseline setup for two or three sessions, then change only foot height, or only stance width, or only toe angle. Keep the change if the target muscle feels more loaded while your knees and pelvis stay comfortable. Drop it if either complains.
The key question isn't which foot position is best. It's which setup gives the stimulus you want without exceeding the joint motion you can tolerate, and that answer is specific to your limb lengths, mobility and history.
Angled Leg Press Compared with Squats and Other Machines
The comparison people want is leg press against squat, and the biomechanics are more interesting than a simple ranked list.
In a 2021 study of recreationally trained adults comparing maximal flywheel leg press and flywheel squat performance, the leg press reached a peak knee-flexion angle 11 degrees deeper than the squat, a statistically significant difference (p = 0.01). Knee-extension net-joint moment came in around 0.15 body weights for the leg press against 0.17 for the squat, while the hip-extension moment was higher at 0.19 against 0.16 body weights. Vastus lateralis force was about 3.0 body weights on the leg press against 3.5 on the squat (flywheel leg press versus squat comparison).

What those numbers show is a shift, not a downgrade. The machine isn't a lower-load substitute for squatting. It moves how force is shared between hip and knee, and its supported track permits a deep knee bend without the whole-body stabilization a barbell demands.
Leg exercises compared on the same criteria
Exercise | Balance and trunk demand | Knee range available | Best fit |
|---|---|---|---|
Angled leg press | Low, back supported | Deep and adjustable | Quadriceps volume, beginners, work after free weights |
Back squat | High, full-body stabilization | Full depth for most lifters | Whole-body strength and athletic carryover |
Hack squat machine | Moderate, back supported | Deep, with shoulder pads | Quadriceps focus with back support |
Leg extension | Low, seated | Knee extension only | Isolated quadriceps work without hip involvement |
The verdict depends on what you're solving for. Want quadriceps volume with the balance handled for you, or extra leg work on a day your back is beaten up? The angled leg press earns its place. Want whole-body stability and carryover to athletic positions? Squat, and use how to squat with proper form to keep the bar path clean. Want knee extension with zero hip involvement, perhaps at the end of a session? That's a leg extension, and nothing else on the list replaces it.
Start Your First Angled Leg Press Session Safely
Choose a load you can lower for two seconds and lift under control, then do two or three sets, stopping each one a rep or three short of where your form starts to change. Set your depth, stance and toe angle using what you've worked out above, and leave those settings alone for the next few sessions so the only thing that moves is the weight.
Expect the first session to feel like a fact-finding mission rather than a workout. Note the seat position, the plate count, and the exact spot where your pelvis starts to lift. That number is your bottom for the next month.
Know the stop signals before you need them. If you feel dizzy, faint, unwell or have unusual pain, stop exercising and inform a member of staff immediately; that's the rule at every Empire Athletics location. If depth, foot placement or load still feels unclear after your first session, ask the staff on the floor. Our trainers build 1:1 custom plans around exactly this kind of setup question, and you can reach the team on 978-990-3972 or at empireathletics247@gmail.com.
Keep your first two weeks boring on purpose: same machine, same settings, small jumps in load. Once that setup is repeatable, you have a baseline to build from, and a full leg workout routine becomes far easier to slot the machine into.
Empire Athletics runs 24/7 gyms in Leominster, Lunenburg and Webster, with the strength equipment and floor staff to put this into practice. Bring your seat height, plate count and depth notes to a certified trainer, and we'll check your setup on the angled leg press and build a plan around your goals. Visit Empire Athletics to see locations and training options.